
Tips on Submitting Your Homework
Your homework for the initial lessons begins with a starter repository, for which you are given a link. You follow the link and fork that repository. (The fork button is on the upper right.) When the fork completes, you are in a copy of the repository on your github account. Click on the green button that says code. The pulldown will give you a URL you copy to your clipboard. In your laptop terminal session, change to the directory where you will keep your code. Before you clone, do a git status to make sure you are not in a git repository. The git status command should return an error, showing that you are not in a git repository. If it doesn’t, you need to switch to a different directory. You never create one git repository inside another!
(In some later assignments, you won’t start with a starter repository. You create your own new repository by creating a new directory and doing a git init. You should do a git status before you create the new directory, to be sure you don’t create it inside an existing git repository.)
Next you do a git clone, pasting in the URL you copied:
git clone <URL>Then you change to the directory created by the cloning. You then do “code .” to start VSCode in that directory. But don’t make any changes yet! Your active branch after the clone is main or master. You don’t make changes to the main or master branch. Instead, you make a new branch for your lesson, as follows (the name of the branch depends on the lesson):
git checkout -b week1Then you are ready to do the programming assignment. Periodically, as you complete parts of the lesson, you can add and commit the changes you have made, and you may even push them to your github:
git add -A
git commit -m "This commit is for parts 1, 2 and 3 of the lesson"
git push origin week1
(The push is optional.) Providing a descriptive comment is a very good habit to have. Once you have finished the lesson, do a git add, commit, and push again. Now you are ready to create a pull request for your lesson. Go to your github in your browser. Find the repository you created with the fork. Click on pull requests, new pull request. The base repository for the pull request must be the main or master branch of your repository on your github.
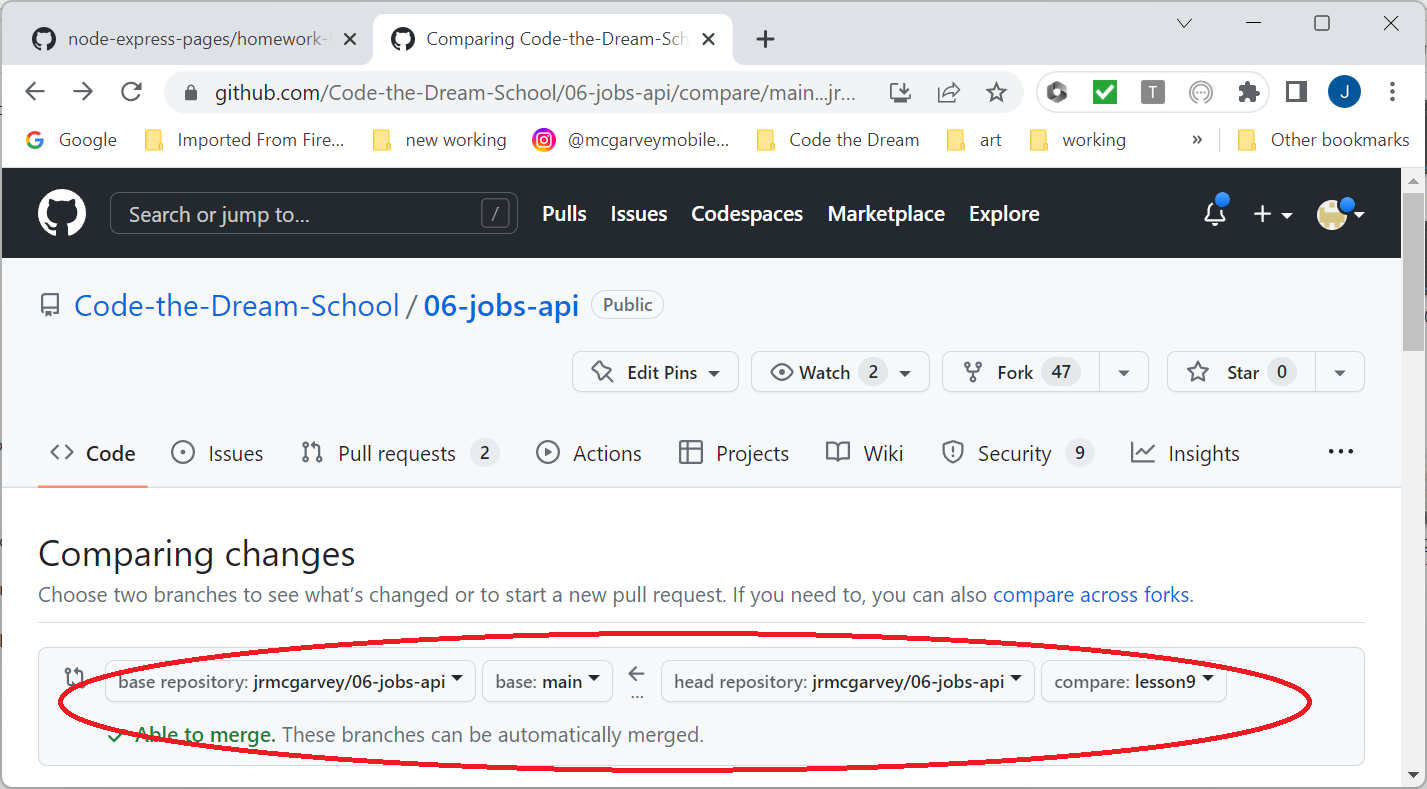
Be sure that the base is not for the Code-The-Dream-School repository, because if it is, you will not be able to merge your branch after the review is complete. The head repository for the pull request must be your lesson branch. See the picture below.
Once you have created the pull request, click on Files changed. You should see the changes you made. Then click on pull requests again, and copy the link for the pull request you just made. This is what you submit using the homework submission form.
Do NOT merge your pull request yet! Your assignment must be reviewed. Your reviewer may request changes. The reviewer will make comments on the pull request. If changes are necessary, you make them to the same lesson branch. Then you add, commit, and push your changes. The additional changes are automatically added to the same pull request. Once your reviewer has approved your lesson pull request, THEN you merge the pull request.
Suppose you start working on the assignment for week2 in a week2 branch, and then your reviewer asks for changes to your week1 assignment. While you are still on the week2 branch, git add and commit your changes. Then git checkout week1. Make the changes your reviewer has requested and git add, commit, and push those changes. They will be added to your pull request automatically. Next, checkout week2 again. Then do a git merge week1. This will move all the changes you just made in the week1 branch into week2.
Sometimes, at this point, you will get a merge conflict, because your week1 and week2 changes overlap in the same files. You should learn to resolve merge conflicts. There is a good tutorial here. Ask a mentor to help you resolve the merge conflict if you have trouble.
Creativity and Experimentation
Once you have finished the assignment, you can be creative and make variations on the instructions and what the instructor shows you. Through creative experimentation, you will learn much more than you would if you had just followed instructions. Of course, there is also a risk of changing so much that you get confused, overwhelmed, and maybe stuck, so for safety, you do your experimentation in a special branch. For example, if you have just completed week 1, while the week1 branch is active, you could do:
git branch -b week1plusThen, try some things! Once you are done experimenting, add and commmit your changes. You don’t need to push them to github. Again, creativity is crucial for learning. It also allows you to take full advantage of the resources CTD provides. Can’t figure something out? Bring your question to a review session! Not sure if you did something the right way? Your assignment reviewer will tell you!
Subsequent lessons build on the previous ones, so you should checkout the week1 branch before creating the lesson branch for week2.
Recovering From a Common Mistake
Suppose you forget and start working on a lesson before you create the new branch. If you haven’t yet committed your changes, you can do
git stash
git checkout -b lesson-branch
git stash apply
Now suppose you forget to create your new branch and you do a commit to main or master. Don’t push it to github! Go ahead and add and commit any additional changes. Then do:
git checkout -b lesson-branch
git checkout main    (or master -- it's main for newer repositories)
git reset --hard origin/main
git checkout lesson-branch
Now suppose you push your main or master branch containing your lesson changes to github. Well, that is bad news. It is not easy to recover the original state, although your mentor can help you do this. Never push to the main or master branch! This is a very bad practice, which is not allowed in real development projects.