
Node/Express Lesson 8 Coding Assignment
We want to give you an opportunity to get creative and to do your own work, so for this assignment, you should try creating your own Express applications. If you don’t feel comfortable doing this yet, you can just emulate the instructor in the video as before. For either assignment, please complete the section at the bottom of this page on how to automatically save the authentication token in Postman.
Preferred Coding Assignment
You continue to work in the node-express-course repository. For this lesson, you work in the 05-JWT-Basics directory. Create a new branch, week8. This branch should be created when the week7 branch is active. Create a folder called preferred inside the 05-JWT-Basics directory. Inside that folder, create an Express application. You’ll need to do an npm init inside that folder (you can accept all the defaults), and you’ll need to npm install the express, jsonwebtoken, and dotenv packages. You also need to create a .gitignore file with .env and /node_modules as lines in that file. Follow best practices in organizing this application: you should have an app.js and then, in separate directories, your routes, middleware, and controllers. (You only need one file in each of these folders for this assignment.)
You’ll need to call two functions from the jsonwebtoken package. The functions are documented here. The functions you need are jwt.sign (to create the token) and jwt.verify (in your authentication middleware). Ideally you would use the asynchronous forms of these functions, with a callback for each, but if that sounds too complicated, just use the synchronous forms. If you use the synchronous calls, be sure that you do a try/catch for the jwt.verify(), as it will throw an error if the token isn’t valid.
The application should have two routes, a POST for /api/v1/logon, and a GET for /api/v1/hello. The POST request takes a JSON body with two attributes, "name" and "password". It returns a 200 (OK) return code and a JSON object with one attribute, a "token", which is the JSON web token. You’ll need a secret (which is a long, hard-to-guess string) and a lifetime, which should be “24h”. These values should be read out of a .env file using the dotenv package. You should store the user’s name inside the token.
You will protect the GET request by a middleware authentication function. This checks the Authorization header. You get that by doing req.header("Authorization"). This should be a string starting with "Bearer " (note the space after the word ‘Bearer’) and followed by a string of random characters. You take the random part of the string (using the split() function) and validate the token. If the token is not present or not valid, you return a 401 (unauthorized) status code and a JSON object that has one attribute, “message” with the value “unauthorized”. (You don’t call next() in this case, because we don’t want to proceed to the controller function.) If the token is present and valid, the middleware gets the user’s name from the token payload. Then it creates a hash with one key “name” and a value being the user’s name, and you save it in req.user. Then call next() to pass control to the controller for the GET request.
That controller should return a 200 response code and a JSON object that has one attribute, “message”, with some message to the user that includes the user’s name (from req.user.name).
Test your application with Postman. What you test for the POST request should be straightforward. But if you try the GET request, you should get back “unauthorized”. To test a successful GET request, you have to configure the authorization for that request in Postman. First do the POST request. You’ll get back a token. Copy the token to the clipboard. Then go to the GET request and click on Authorization. Select Bearer and paste in the token. Save the request. Then send it. You should get back the message with your user’s name.
Optionally, you could create a simple HTML and JavaScript front end for the application in a preferred/public directory. The front end would have a login form, and would make a fetch or axios request to the back end API to do the login, saving the resulting token in local storage. Then it would send another fetch or axios request to the back end, with a Bearer token in the authorization header, to get the hello message, displaying the result to the user. This is only a few lines of work, and you can look at the video instructor’s example.
Alternate Coding Assignment
This is only in case you aren’t confident that you can complete the preferred coding assignment. You continue to work in the node-express-course repository. For this lesson, you work in the 05-JWT-Basics/starter directory. Create a new branch, week8. This branch should be created when the week7 branch is active. Then run npm install to install the required node packages. Duplicate the steps that the instructor performs, testing with Postman as you go. There are two routes to test, a POST route to /api/v1/login, and a GET request, to /api/v1/dashboard. For the GET request, you have to configure the authorization for that request in Postman. First do the POST request and copy the token to the clipboard. Then go to the GET request and click on Authorization. Select Bearer and paste in the token value. Then save the request and try it.
Saving the Token Automatically in Postman
This is a little complicated, but you should learn to do it for use in future assignments. First click on New in the upper left, and select Environment. Set the title to JWT Basics. Then on the upper right, click on Environments and set it to JWT Basics, to make that environment active.
 (right-click and open image in a new tab to see it a little larger)
Now open up the POST request for logon. Click on tests. Then enter the following code:
const jsonData = pm.response.json();
pm.environment.set("token", jsonData.token);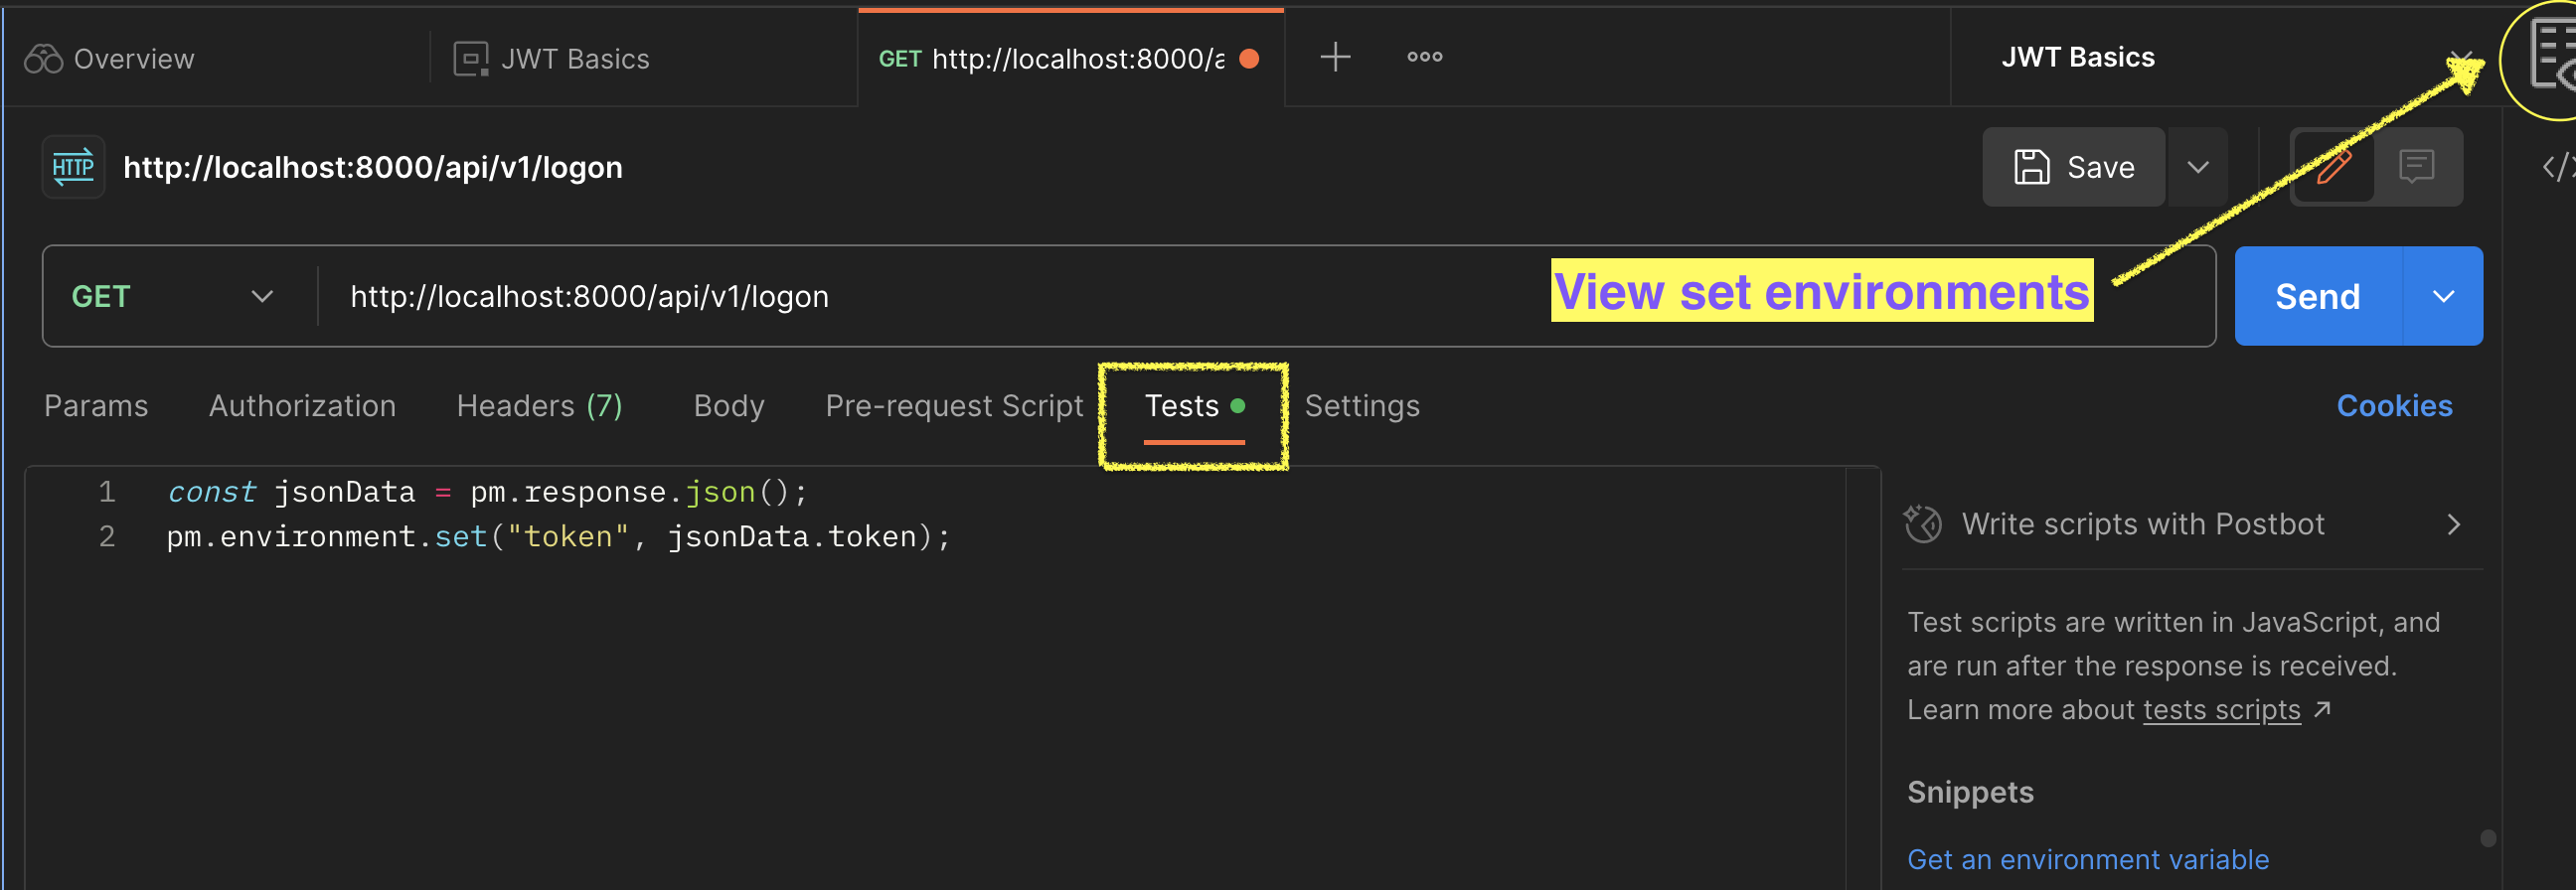
This code reads the "token" attribute from the response JSON and saves it in the “token” environment variable that you created earlier. Then save and run the logon request. There is an icon on the upper right with an eye on it. This gives you a look at the environment. You should see the token in the environment.
Next, open the GET request authorization again. Click on authorization, Bearer. This time, for the token value, put {{token}}. This uses the token variable from the environment. Then save and run the request. It should work as before.