
Node/Express Lesson 1 Coding Assignment
You should already have done the steps described in the Getting Started page. That page describes how to get git, the VSCode Editor, Node, and Postman all installed. All of those should be installed before you start this lesson.
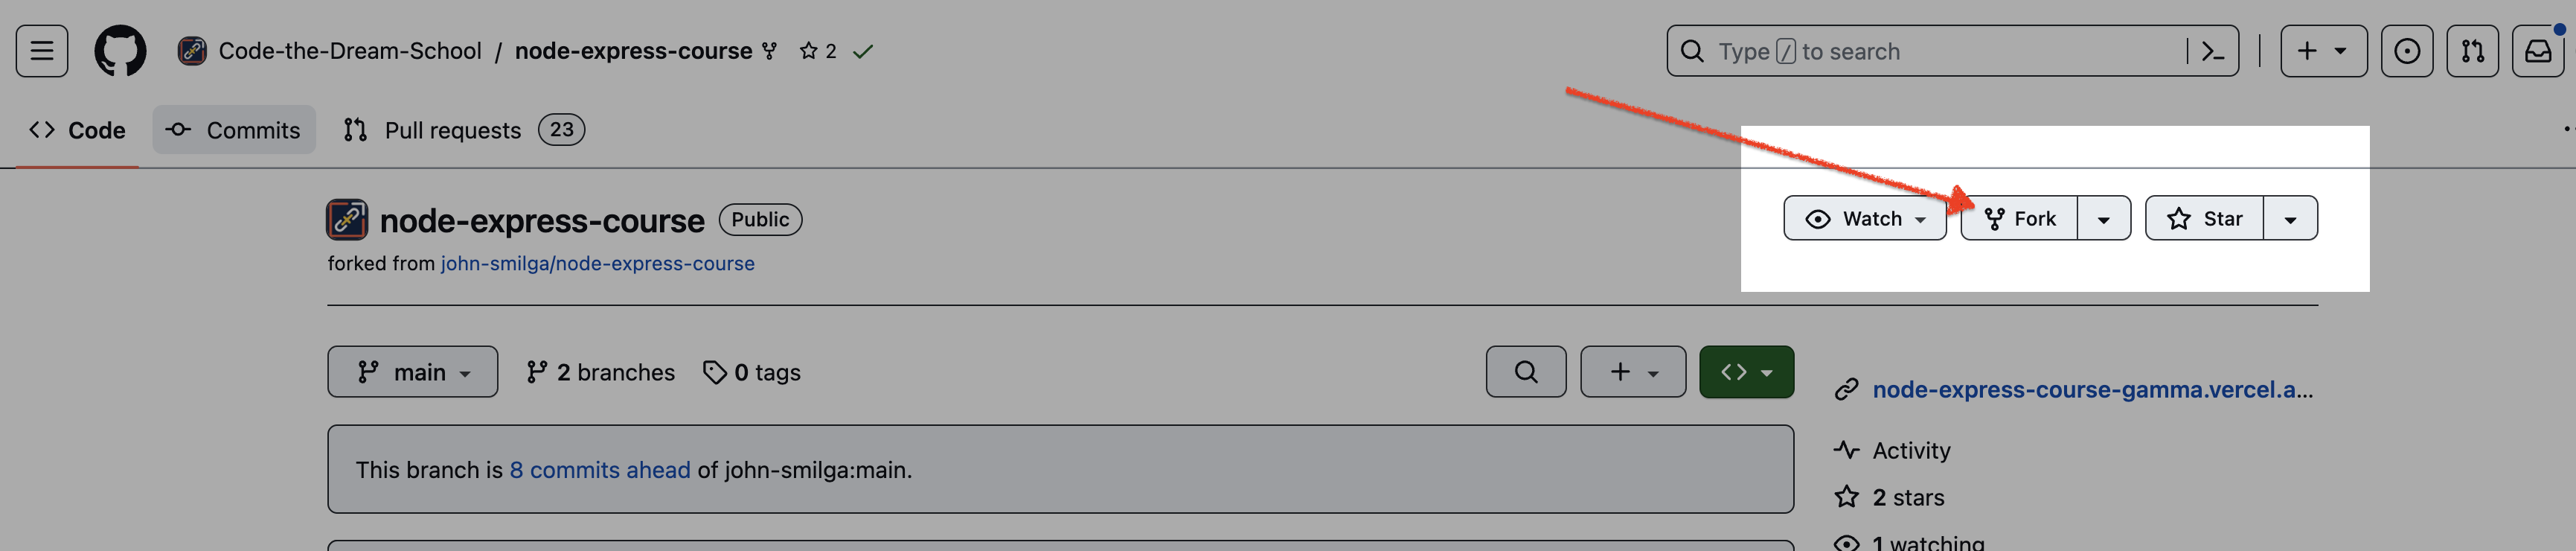
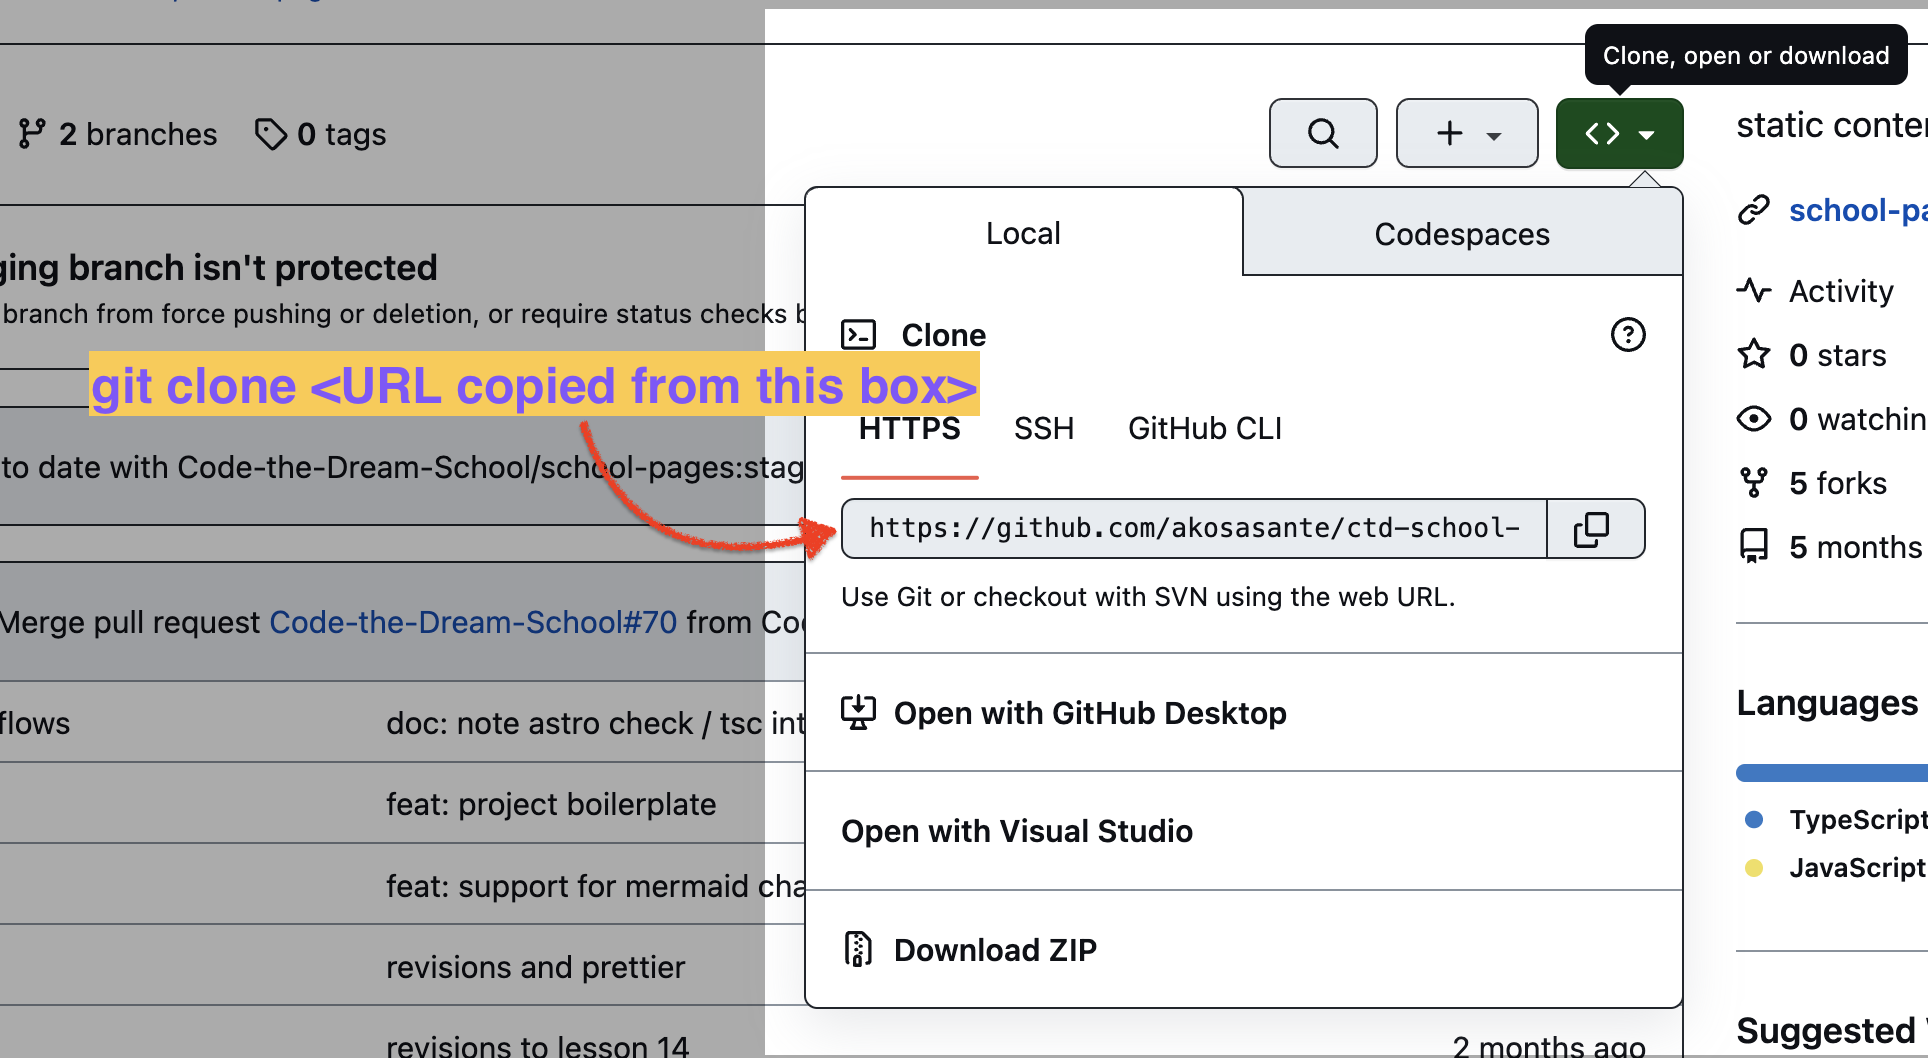
The next step is to create a “fork” of your starter repository for this lesson, which is found here. The fork button is on the upper right of that page. Once the fork is complete, you must git clone your fork to get the repository files onto your computer.
Careful!
Please don’t clone the original Code-the-Dream repository, as if you do that, you will not be able to push your work to Github.
You will do all of your work inside the directory created by the git clone command. By default, this directory will be called “node-express-course”. Change directories so that you are inside that directory. Then create the branch for this week, using the command git checkout -b week1.
Now change the directory to the one that says 01-node-tutorial/answers. You’ll do all of this week’s work inside this directory.
Create the following programs for this lesson, all within the “answers” directory. By the way, there are examples of each of the programs you need to create in the 01-node-tutorial directory (in case you get stuck) but try to do your own work. If you need to review a section of the video for any of these exercises, view the video within Youtube, but not in full screen mode. The panel on the right will show you the chapter of the video so that you know what you should review.
Your homework should include the following programs:
01-intro.js: This program should use theconsole.logfunction to write something to the screen. While you are in the “answers” directory, run the command,node 01-intro.js, to verify that the program runs. You can also put additional JavaScript logic in your program.02-globals.js: This program should use theconsole.logfunction to write some globals to the screen. Set an environment variable with the following command in your command line terminal:export MY_VAR="Hi there!"The program should then useconsole.logto print out the values of__dirname(a Node global variable) andprocess.env.MY_VAR(processis also a global, and contains the environment variables you set in your terminal.) You could print out other globals as well (Node documentation on available globals). For each of these programs, you invoke them withnodeto make sure they work.- For the next part, you will write multiple programs.
04-names.js,05-utils.js,06-alternative-flavor.js, and07-mind-grenade.jsare modules that you load, using require statements, from the03-modules.jsfile, which is the main program. Remember that you must give the path name in your require statement, for example:
const names = require("./04-names.js");(3a). 04-names.js should export multiple values in an object that you will require in 03-module.js.
(3b). 05-utils.js should export a single value, which is a function you will call in 03-modules.js.
(3c). 06-alternative-flavor.js should export multiple values in the module.exports object, but it should use the alternative approach, adding each value one at a time. The exported values from each should be used in 03-modules.js, logging results to the console so that you know it is working.
(3d). 07-mind-grenade.js may not export anything, but it should contain a function that logs something to the console. You should then call that function within the code of 07-mind-grenade.js. This is to demonstrate that when a module is loaded with a require statement, anything in the mainline code of the loaded module runs.
NOTE: The only program you should need to actually invoke to test that everything is working is 03-modules.js, because it loads all the others (files 4-7).
08-os-module.js: This should load the built-inosNode module and display some interesting information from the resulting object. As for all modules, you load a reference to it with a require statement, in this case
const os = require("os");You can look here for documentation on the stuff in the built-in os module.
09-path-module.js: This should load thepathNode module, which is another built-in module. It should then call thepath.joinfunction to join up a sequence of alphanumeric strings, and it should print out the result. The result will work one way on Windows, where the directory separator is a backslash, and a different way on other platforms, where the directory separator is a slash.
# Example of a Windows path:
C:\Users\JohnSmith\node-express-course\01-node-tutorial\answers

# Exmaple of a Mac or Linux path:
/Users/JohnSmith/node-express-course/01-node-tutorial/answers10-fs-sync.js: This should loadwriteFileSyncandreadFileSyncfunctions from thefsmodule. Then you will usewriteFileSyncto write 3 lines to a file,./temporary/fileA.txt, using the"append"flag for each line after the first one. Then usereadFileSyncto read the file, and log the contents to the console. Be sure you create the file in thetemporarydirectory. That will ensure that it isn’t pushed to Github when you submit your answers (because that file has been added to the.gitignorefile for you already which tells git not to look at those files).11-fs-async.js: This should load thefsmodule, and use the asynchronous functionwriteFileto write 3 lines to a file,./temporary/fileB.txt. Now, be careful here! This is our first use of asynchronous functions in this class, but we are going to use them a lot! First, you need to use the"append"flag for all but the first line. Second, each time you write a line to the file, you need to have a callback, because thewriteFileoperation is asynchronous. Third, for each line you write, you need to do the write for the line that follows it within the callback – otherwise the operations won’t happen in order. Putconsole.logstatements at various points in your code to tell you when each step completes. Then run the code. Do the console log statements appear in the order you expect? Run the program several times and verify that the file is created correctly. Here is how you might start:
const { writeFile } = require("fs");
console.log("at start");
writeFile("./temporary/output.txt", "This is line 1\n", (err, result) => {
  console.log("at point 1");
  if (err) {
    console.log("This error happened: ", err);
  } else {
    // here you write your next line
  }
});
console.log("at end");
To get the lines to be written in order, you end up with a long chain of callbacks, which is called “callback hell”. We’ll learn a better way to do this soon.
-
12-http.js. This program should use the built-inhttpmodule to create a simple web server that listens on port 3000. This is done with thecreateServerfunction. You pass it a callback function that checks the request variable (req) for the currenturlproperty, and depending on what the URL is, sends back a message to the browser screen. Then have your code listen on port 3000, run this file with thenodecommand, and test it from your browser, by navigating tohttp://localhost:3000. You can look at12-http.jsfor the instructor’s answer (except that program listens on 5000). You will need to type in Ctrl+c (the Ctrl key plus the letter “C” at the same time; or for Mac the Cmd key plus the letter “C” at the same time) to exit your program. -
Within your “answers” directory is a program called
prompter.js. This is a program for a simple server. Try it out! It will display a form in the browser when you run the file and navigate tohttp://localhost:3000. Then, when the user submits the form, it echoes back what was submitted, and displays the form again. You don’t have to worry about how it works. There is a simple body parser to read any values submitted with the form, and that parser returns a hash with the name and value of each. Because the parser is asynchronous, you get back the hash in a callback.
Now, your task is to change this program so that it does something interesting! First, you can change the variables that you want to store when you get the form back. Then, you can change the form itself to return the values you want from the user, which you store in those variables. Then, you can use string interpolation to insert the values of your variables into the HTML. Finally, you change the logic that handles the hash of values you get when the user submits the form, so that you save the values the user submits. The places you would change are marked in the code.
For example, you could change the input field to be a dropdown with various colors, and you could set the background color of the body to be what the user chooses. Or, you could make a number guessing game: Start with a random number from 1 to 100, let the user guess, and tell the user if their guess is low or high. In this case, you’d change the input field so that it accepts only numeric input (but when it is returned in the hash, it will be a string, so you’d have to convert it.)
When you are done, change directories to the 01-node-tutorial folder and then do the following to submit your work:
git commit add ./answers
git commit -m "answers for lesson 1"
git push -u origin week1
Then go to your GitHub repository – the one you created with a fork (the URL should have your Github username in it). Create a pull request. You may see a yellow banner on your repository if you recently pushed your change, where you can click the “Compare & pull request” to create a PR. Otherwise, you can switch to your branch in the dropdown on the repo page, and then click the pull request icon to create a PR that way.
Careful!
The target of the pull request should be the main branch of the repository you created when you forked — not the Code-the-Dream-School main branch!
Once you have created the pull request, you can copy the URL to link the pull request in your homework submission form. The homework submission form is on the main page for this lesson. This will be the general procedure for submitting homework for this course.
When you submit your homework, you also submit your answers to the mindset assignment, if there is one for that lesson.